


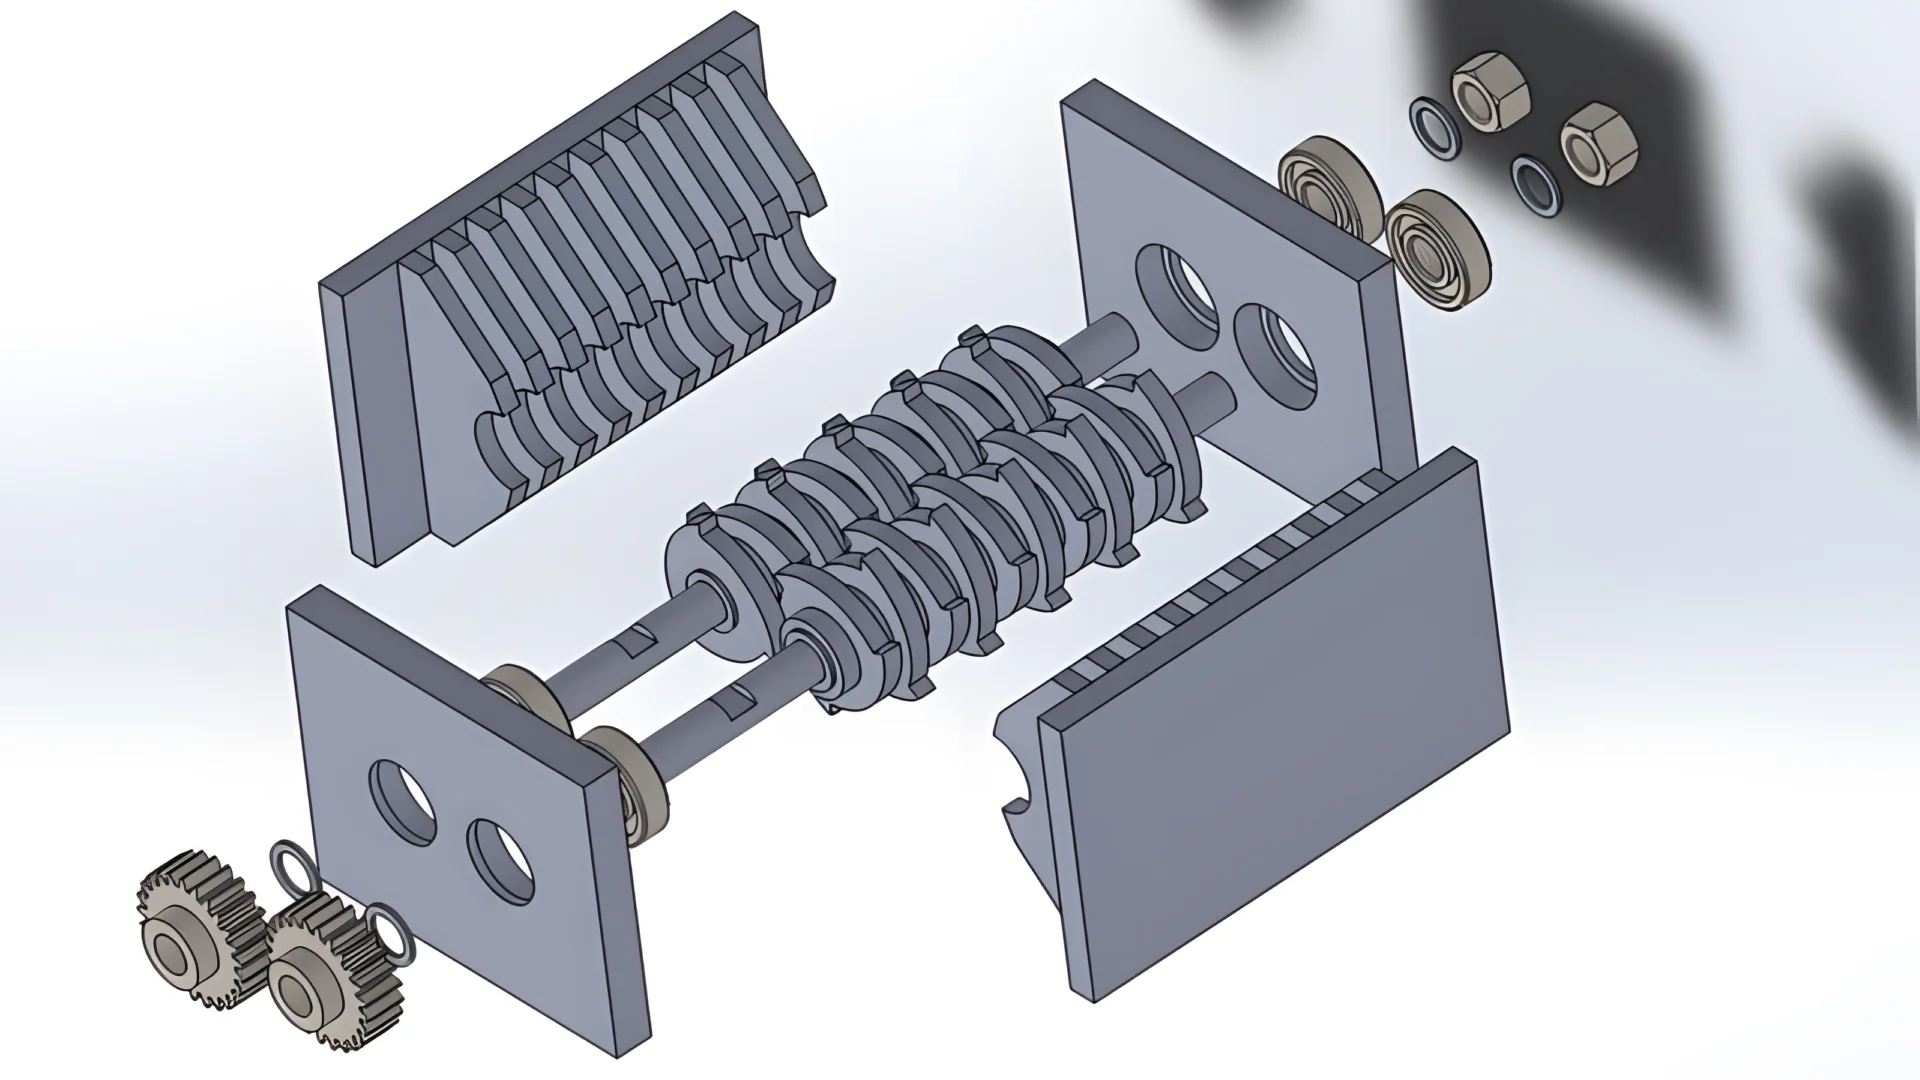
El reemplazo de la hoja de la trituradora es una tarea de mantenimiento controlado, no un simple intercambio de piezas. Antes de abrir la cámara de corte, aísle cada fuente de energía, documente la disposición actual de las hojas, inspeccione el rotor y las cuchillas contrapuestas y confirme las especificaciones de par y desplazamiento del fabricante. Después de la instalación, gire el rotor manualmente donde el diseño de la máquina lo permite, realice una prueba de carga sin material protegida y solo entonces reintroduzca el material gradualmente.
Esta guía proporciona un marco práctico para el mantenimiento de trituradoras industriales de un eje y de múltiples ejes. No sustituye al manual de la máquina, al procedimiento de bloqueo del sitio o al trabajo de personal calificado. Si está seleccionando grados de acero o ordenando un nuevo conjunto de cortadores, primero lea nuestra guía de selección de hojas de trituradora industrial.
¿Cuándo Necesitan Atención las Hojas de la Trituradora?
No espere a que una hoja se rompa. La condición de la hoja debe rastrearse utilizando tonelaje procesado, horas de operación, carga del motor, calidad de salida y hallazgos de inspección. Un cambio en una métrica puede tener varias causas, por lo que inspeccione todo el sistema de corte antes de reemplazar las piezas.
| Cambio Observado | Causa Posible | Revisión Inmediata |
|---|---|---|
| Corriente del motor más alta o tiempo de ciclo más largo | Cuchillas afiladas, alimentación excesiva, material enrollado o desplazamiento incorrecto | Bordes de la hoja, impulsor hidráulico, acumulación de la cámara y cuchilla contrapuesta |
| Bandas desgarradas en lugar de cortes limpios | Bordes redondeados o desplazamiento excesivo de la hoja contra la cuchilla contrapuesta | Condición del borde, posición de la cuchilla fija y superficies de montaje |
| Más finos, polvo o calor | Frote repetido, bordes afilados, daño de la malla o sobreprocesamiento | Malla, espacio de corte, velocidad del rotor y recirculación |
| Nueva vibración o golpeteo | Fallo de sujetador, cortador astillado, error de apilamiento, problema de cojinete o alineación | Detenga inmediatamente y inspeccione antes de reiniciar |
| Desgaste irregular en el rotor | Alimentación irregular, desviación del rotor, deflexión del eje o contaminación del asiento de la hoja | Patrón de alimentación, cavidades de la hoja, cojinetes, cortadores y espaciadores |
| Raja visible, esquina perdida o hoja deformada | Impacto, contaminación, material inadecuado o error de instalación | Retire la máquina del servicio y investigue el fallo |
Swipe horizontally to view the full table.
Preparación de Seguridad Antes de Abrir la Trituradora
Las trituradoras pueden retener energía eléctrica, hidráulica, neumática, gravitacional y mecánica después de que se desconecte el interruptor principal. Siga el procedimiento de control de energía escrito en su sitio y las regulaciones aplicables. La guía de control de energía peligrosa de OSHA Explica el propósito de la bloqueo/etiquetado, mientras que su recursos de protección de la máquina Acceso cubierto a partes en movimiento peligrosas.
- Detenga la alimentación y permita que la cámara se vacíe utilizando la secuencia de apagado aprobada.
- Identifique cada fuente de energía, incluyendo la presión hidráulica almacenada, las tapas elevadas, los volantes y los ensamblajes de rotor suspendidos.
- Aplicar cerraduras y etiquetas personales según el procedimiento del sitio.
- Libere o restringa la energía almacenada y verifique un estado de energía cero.
- Cubos o cubiertas de soporte, ejes y componentes pesados con equipos calificados.
- Utilice herramientas de manejo resistentes al corte y equipos de protección adecuados para la hoja y la tarea.
- Fotografa y marque la disposición original de la cuchilla, separador, aplanador y fijador antes de desmontaje.
Los ejes grandes y los montajes de cortadores pueden pesar cientos de kilogramos. Utilice un plan de elevación documentado, puntos de elevación calificados y equipos con suficiente capacidad. Nunca coloque las manos debajo de un eje suspendido o un paquete de cortadores.
Herramientas y Registros a Preparar
- Manual actual de la máquina, dibujo de la cuchilla y diagrama de montaje
- Equipos de bloqueo/etiquetado y herramientas de verificación de energía cero
- Equipos de elevación calificados, soportes y fijaciones para manejo de cuchillas
- Calibrated torque wrench and the manufacturer’s tightening sequence
- Regla, medidor de feeler, indicador de burbuja y herramientas de medición requeridas por el OEM
- Herramientas de limpieza que no dañarán las superficies de montaje precisas
- Nuevos accesorios de sujeción, dispositivos de bloqueo, repisas y sellos aprobados donde se especifican
- Hoja de inspección para posición de la cuchilla, dimensiones, daños, par de torsión y resultados de inicio
Cuchilla de desmenuzadora de un solo eje: rotación y sustitución
Muchos trituradoras de un solo eje usen cuchillas de rotor cuadrado con dos o cuatro bordes útiles. Si la cuchilla está dentro de sus límites dimensionales y no tiene grietas, deformaciones o daños en el asiento, rotarla a un borde no utilizado puede restaurar el rendimiento de corte sin instalar un nuevo conjunto.

- Registrar la condición actual. Notar la posición del borde, el patrón de desgaste, las áreas desgastadas y cualquier ubicación con acumulación anormal.
- Exponga el rotor de manera segura. Abra y asegure mecánicamente la cámara utilizando el procedimiento OEM.
- Retire una cuchilla a la vez cuando sea práctico. Esto preserva la información de posición y hace que el desgaste irregular sea más fácil de rastrear.
- Limpie la cavidad de la cuchilla y los filetes. El plástico, los chips de metal o los daños elevados debajo de la cuchilla pueden evitar un ajuste completo y causar fracturas prematuras.
- Inspeccione la cavidad y el sujetador. Busque frotamiento, grietas, filetes desatornillados, tornillos estirados o superficies de ubicación dañadas.
- Gire o sustituya la cuchilla. Mantenga la orientación consistente con el dibujo del rotor. No mezcle geometrías o espesores no aprobados.
- Instale sujetadores aprobados. La lubricación o los productos de sellado de rosca cambian la carga de sujeción y deben coincidir con las instrucciones del fabricante.
- Tornille en el orden especificado. Use el par de torsión específico de la máquina, no un valor genérico basado solo en el diámetro del tornillo.
- Inspeccione y ajuste la cuchilla contraria. Medir el juego en todas las posiciones del rotor requeridas y tener en cuenta el desvío.
- Repetir y documentar. Registrar cada posición girada o sustituida para que todos los bordes puedan ser gestionados de manera consistente.
Servicio de pilas de cortadores de doble y multi-eje
A Trituradora de dos ejes normalmente utiliza cortadores entrelazados y separadores. El ancho de la pila, la orientación del cortador, el tiempo de enganche y la posición del eje determinan si los cortadores cortan correctamente. Este trabajo es más complejo que girar cuchillas cuadradas y puede requerir la remoción del conjunto completo del eje.
- Marque cada eje, cortador, separador y componente terminal antes de su remoción.
- Medir la pila montada y las referencias del eje expuesto antes de aflojarla.
- Soporte el eje y retire los rodamientos, engranajes, sellos o retenedores solo en el orden aprobado.
- Proteja los bordes del cortador y las superficies precisas del eje durante el levantamiento y la separación.
- Inspeccione el espesor del cortador, el espesor del separador, el diámetro del orificio, la ranura de clavija o la ranura espiral, el desvío del eje y la condición del cojinete.
- Grupe los cortadores y separadores de reemplazo como un conjunto coincidente; la variación acumulada del espesor puede cambiar el juego final y el alineamiento del cortador.
- Reasamble el patrón de gancho y el tiempo del cortador exactamente como se muestra en el dibujo.
- Verifique la rotación del eje y la intersección a través de una revolución completa antes de volver a conectar la energía.
Si no están disponibles los dibujos, los dispositivos de elevación o las especificaciones de pilas, contacte al fabricante del triturador o un proveedor de servicios calificado en lugar de reconstruir el arreglo desde la memoria.
Juego de hoja, Torque de sujetador y Alineación
No hay juego universal de hoja de triturador. El juego correcto depende del diseño de la máquina, la geometría de la hoja, el espesor del material, el desvío del rotor, las condiciones térmicas y el rendimiento objetivo. Un valor utilizado para un triturador de plástico rígido puede ser inseguro o ineficaz en un modelo diferente.
- Medições en las ubicaciones y posiciones del rotor especificadas en el manual.
- Confirme que los asientos de la hoja, los soportes de cuchilla contraria y los rellenos estén limpios y sin daños.
- Verifique el desvío del rotor o eje antes de usar rellenos para corregir un juego inconstante.
- Utilice herramientas calibradas y registre las medidas finales.
- Después de aflojar, vuelva a verificar el juego porque la carga de la abrazadera puede mover la cuchilla fija.
El torque también depende del grado del sujetador, la condición del roscado, la lubricación, el método de bloqueo y el diseño de la unión. El uso de tornillos estirados o dañados puede causar pérdida de carga de la abrazadera incluso cuando la llave dinamométrica alcanza la lectura objetivo.
Reafilado, Rotación o Reemplazo?
| Condición de la hoja | Acción probable | Revisión requerida |
|---|---|---|
| Un borde desgastado; los bordes restantes no utilizados | Gire si el diseño de la hoja lo permite | Sin grietas, deformación, daño en el asiento o violación del tamaño mínimo |
| Desgaste uniforme del borde con suficiente margen de rectificado | Reafilado utilizando un procedimiento aprobado | Dimensiones finales, geometría del borde, daño térmico y consistencia del juego |
| Desgaste localizado pequeño | Evaluación técnica antes del reafilado o sustitución | Extensión de la grieta, causa raíz, sección restante y equilibrio |
| Grieta profunda, fractura grande o hoja deformada | Reemplace e investigue la falla | Contaminación, material, tratamiento térmico, rebeca, par de torsión y alineación |
| Husillo, ranura espiral, ranura de clavija o superficie de montaje dañada | Reemplace a menos que exista una reparación aprobada | Transferencia de par, ajuste y condición del eje |
| Hoja por debajo del tamaño permitido mínimo | Reemplace | No compensar con espaciadores no aprobados o cambios de separación |
Swipe horizontally to view the full table.
El rectificado cambia las dimensiones de la hoja. Un conjunto debe procesarse y medirse de manera consistente para que las alturas o espesores mixtos no creen una carga desigual. Para opciones de reemplazo, consulte nuestra cuchillas de reemplazo para trituradora de plástico.
Inspección Pre-arranque y Prueba Controlada
- Verifique que todos los cortadores, cuchillas contrarias, separadores, pantallas, sujetadores, protectores y cubiertas estén instalados.
- Retire las herramientas, piezas sueltas, dispositivos de elevación y materiales de limpieza de la cámara.
- Donde el diseño lo permite, gire el eje manualmente a través de un ciclo completo y confirme que no hay contacto.
- Vuelva a instalar los protectores y despeje el personal antes de quitar los bloqueos según el procedimiento del sitio.
- Movimiento o funcionamiento de la máquina vacía utilizando el procedimiento de inicio del fabricante.
- Detenga inmediatamente si hay contacto, ruido inusual, vibración, aumento de temperatura o corriente del motor anormal.
- Introduzca una pequeña cantidad limpia de materia prima normal y observe la calidad de corte y la carga.
- Vuelva a inspeccionar los sujetadores, fugas, temperatura y condición de la hoja después del primer viaje controlado cuando se especifique.
Programa de Mantenimiento Preventivo
Use los datos de condición y producción para establecer intervalos. Los programas basados en el calendario pueden ser engañosos porque una planta procesa películas limpias mientras que otra maneja escrapos rígidos abrasivos y contaminados.
| Intervalo | Requisitos de Verificación |
|---|---|
| Cada cambio de turno o inicio | Ruido, vibración, carga del motor, calidad de corte, fugas, protectores y acumulación visible en la cámara |
| Inspección planificada | Límites de las cuchillas, cuchilla contraria, pantalla, fijaciones, enrollado, condición de la cavidad y contaminantes |
| Después de un atascamiento o un evento de objeto extranjero | Detenga e inspeccione las cuchillas, el eje, los rodamientos, la criba, la cuchilla contraria y el motor antes de reiniciar. |
| En rotación o cambio de cuchillas | Registro de posición, dimensiones, par de fuerza, holgura, modo de desgaste y piezas utilizadas |
| Revisión de tendencias | Comparar la vida útil, la tonelada procesada, el consumo de energía, el tiempo de inactividad y las ubicaciones de fallos |
Swipe horizontally to view the full table.
Cómo Extender la Vida Útil de las Cuchillas de Shredder
- Elimine los metales y otros contaminantes duros antes de que lleguen a la máquina de shredding.
- Keep feed within the machine’s approved size and loading limits.
- Evite continuar la operación después de vibraciones, contacto de cuchillas o un atascamiento mayor.
- Mantén las cavidades de las cuchillas y los soportes de las cuchillas contrarias limpios y planos.
- Gire las cuchillas de múltiples bordes antes de que el desgaste severo dañe el asiento o aumente la carga del motor.
- Mantener los empujadores hidráulicos, las cribas, los rodamientos y los ejes junto con el sistema de corte.
- Guarde un juego de repuestos compatible en una estantería seca y protegida junto con sus dibujos y informe de inspección.
- Utilice las fotos de fallos y los registros de servicio al especificar el siguiente juego de cuchillas.
Explora nuestra completa cuchillas para máquinas de reciclaje para aplicaciones de shredder, crusher y granulador.
Preguntas frecuentes
Solicitud de reemplazo de cuchillas o soporte de servicio
Envíe el modelo de la trituradora, el dibujo de las cuchillas o las dimensiones de la muestra, la información del material de alimentación, la vida útil actual y fotos claras del desgaste o fractura. Nuestro equipo puede revisar las opciones de reemplazo y ayudar a identificar la información necesaria para un conjunto de cortadores coincidentes.
